Outstanding Marksmanship Fundamental Post!
- Get link
- X
- Other Apps
Noob or 'old hand,' it's chock-full of tips and info! Make sure you read the whole thing.
Here.
AR-15 TARGETS, TRAJECTORY, AND TESTING: KNOWN DISTANCE KNOWLEDGE
Posted by Johnny Paratrooper | Feb 8, 2021
At AP, we believe in good comms, clean weapons, and a perfectly zeroed rifle.
Now that you have the basic necessities for cleaning weapons. “Weapons Cleaning Crash Course w/ Items Index” Let’s get you zeroed like a real shooter, and throw you some “quick & dirty” lessons on reading wind, trajectory theory(On flat ground…), and some known distance skills.
Let’s get you guys squared away with some techniques for the AR pattern rifle and Mil-Spec M855 and M193 ammo. Since ya’ll bought every single mil-spec bullet in the country (I’m so proud brothers) I would say it’s time you learn some proper lessons on zeroing the AR platform with mil-spec ammo. This is a weapons system, and it works when you follow the rules. ALL the rules, with a few exceptions.
Do you have a manual? First, Let’s get some technical data on the table…
https://eagledef.files.wordpress.com/2015/04/fm.pdf
This one below has some spicy formulas in short form. But the above is in HD.
http://combatindex.com/store/field_man/Sample/FM_3-22_9.pdf
Amazon link for manuals
How about some zero targets? Second, print a couple of these out…
http://www.printfreetargets.com/target/1/m4-carbine-25-meter-zeroing-target.html
This is the M4 25/300 meter zero target. It works for any weapon, like the AK, but was designed for the M4. I’m gonna clone this article for the AK later this week. Your AK is more like 25/200 meters; That’s a TWO HUNDRED, not a THREE HUNDRED, meter zero.
Let’s get started. This is A LOT, and there is more in the manuals.
If you have a 20 inch AR, your zero isn’t 25/300 meters. It’s 25/350 meters. This is true for 18 inch rifles or 14.5 pinned and welded; It’s basically a 20 inch M16 or 16 inch respectively.
It’s important to remember, your commercial weapon is almost certainly more accurate than the Military M4/M16. It’s probably a 1 MOA gun, even the $600 cheap AR’s are 1 MOA in my experience. Nice.
But the mil-spec ammo doesn’t change; It’s a 3-4 MOA cartridge. So you have a 3-4 MOA gun.
So your gun is 3-4 MOA. Not a big deal. I cover this later in the article. Hint=Fire a few more rounds… that’ll compensate for the spread. If you are lucky, your weapon can fire mil-spec at 2ish MOA. That’s rare, but it happens. Usually with something like match grade barrels & “Wylde” chambers but not always. Don’t sell those guns. They are worth extra.
Let’s take a look at my favorite zero target.
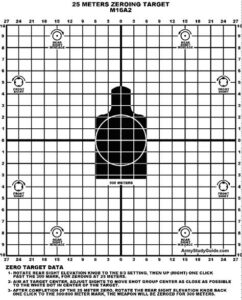
This target, when placed at 25 meters exactly from your barrel, will replicate the size of an average man standing at 300 meters. The group you fire at 25 meters represents the spread you will have at 300 meters, assuming no wind. These targets are priceless pieces of paper.
Target Printer Go Brrrrr….
The wind can blow the 5.56 round around quite a bit.
Observe the graph below.
And the next one.
You’l notice that the wind is predictable in it’s effect.
This is an overhead view (Above)
The cartridge listed is M193; M855 requires less, About 10% less if I remember correctly.
It’s possible to fire one ragged, cloverleaf hole at 25 meters with most M4 style rifles, but this takes lots of dry fire practice in the prone to build muscle, trigger pull/release discipline, and breathing technique. An acceptable group should be inside of a dime. Practice, Practice, Practice.
Be careful in your shooting position. Try to be conscience of your weapons vertical and horizontal axis.
Observe below
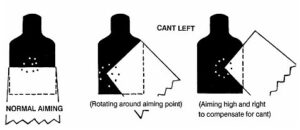
This effect is hard to notice at 25 meters. At 300 meters and beyond, the effect is obvious. This effect occurs with Ironsights, Scopes, and Red Dots.
When wrapping around corners in an urban environment, or trees, you want to keep your weapon vertical; Or compensate for the “cant” of the weapon. Vertical is best. Compensating requires thinking. The Eotech has hash marks to annotate X&Y axis. So you can square, plumb, and level up when aiming at a building, door, car, or person. The Eotech is a great optic. Too easy. The 50/200 zero is similar in theory to the 25/300 zero. The choice is yours. I prefer the 25/300; More on why later.
An Eotech Reticle Below. Note the 7 yard hold for CQB hostage shots.
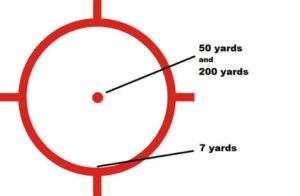
Pretty neat. The Eotech is a fine optic. I own several of them. Don’t forget to clean your barrel and weapon before zeroing. Your groups open up, or shift, with a dirty barrel. It should be nice, bright, and shiny. Let’s get your weapon ready to zero.
Remember to set your Rear Iron Sight to the 300 marker. Or the white line just past the “300” on the M16 Rear Sight. Make sure your rear sight is properly mounted and torqued. Mounted the same for any optic. Rears sights are mounted on the last top rail notch. Use blue locktite if you feel inclined. These weapons get beat up in the field. This is covered in much more detail in the manuals. Those manuals are great.
It’s a weapon system.
I like to hold my iron sights on the bottom of the target, at the “belt buckle”, for a solid, consistent and clean hold. Just on the edge of the white and black. After a 5 round group, I make my adjustment clicks, and then switch to the “head” when the “belt buckle” portion of the target is shot out.
Switch your point of aim to the white cross, “+” where the jawline or mouth would be on the “head”. Zero a nice group so that your group lands just below the head’s top white cross, “+”, where the eyebrows would be on the “head”. This is typically 2 clicks of adjustment “Up” from your point of aim. Two clicks is perfect, no more clicks for now. You should zero your group so it “Lollipops” a nice group on the top of your front sight post.
Let’s test this zero. Observe the little circles on the perimeter of the target’s field.

Those circles on the outside of your zero target annotate adjustment direction for the uninitiated. There are eight total. Two in each corner. Ignore the directions in those circles if you have a commercial rear sight, that’s for military spec rear sights only. Specifically, the M4 rear sight.
Put those on top of the front sight like a lollipop. Fire one good shot at all 4 of them on one half of the target. Focus on your very best. You have 4 chances.
Give it your very best. Take your time. This is where it really counts.
Practice centering this small target on your front sight post. This is important for long range engagements. This is where you really make the magic happen.
Did you hit consistently in one direction? High? Low? Left? Right? Adjust 1 click… and only one click; Even if you think it needs two. Mark impacts, or shift to the other side. Test again. One click only to adjust. Color in the circles with a Black Sharpie to darken for clarity before placing your targets downrange. “Shoot ‘N See” Dots work too, if they are smaller than the front sight post. Clean your bore between groups if you can.
These can be hard to see for some folks. You can, and will, bullseye these little circles with a clean bore rifle. Cleaning your bore between groups isn’t crazy. You should consider using a fresh, clean bore snake to polish up your bore, or run dry patches down the barrel in the direction of the bullets. When you start dropping rounds in, or on, these little circles, and you don’t see your weapon favoring left, right, up, or down after testing all 4 twice; You have a perfectly zeroed weapon.
Remember, 3 or 4 of 4 shots on those little circles will favor one direction assuming your weapon IS NOT perfectly zeroed. If you cannot “read” the shots fired, and which direction your weapon favors, you have 3 possible problems or answers. This can require some testing. But I assure you, once it’s done, it’s done, unless there is a radical seasonal shift in temperature. Like high summer to dead winter.
The possible problems or answers are…
1) Poor Fundamentals of Marksmanship, or, you have a thermal shift in your barrel.
2) Your barrel is dirty and you forgot to run a snake or a few dry patches through it.
3) That is the maximum accuracy of the weapon and/or ammo. AKA the “Mechanical Accuracy”
Testing multiple guns, if you own them, using this process will reveal which one is the best ammo to weapon match. Use that one in case of emergency. Take your time; This isn’t a race.
This is a scientific process.
Repeat until you are satisfied. This works very well. Trust me.
Next, let’s go over some range estimation techniques. Since your rifle is perfectly zeroed.
From the link below.
http://www.ar15-m16.com/FM3-22.9marksmanshipmanual/c07.htm#fig7_39
Range Estimation Training. The [Shooter] can use several different methods to determine range to the target to include the 100 meter “unit-of-measure” method, range card method, front sight post method, appearance of objects method, and the combination method.
A) 100-Meter Unit-of-Measure Method: To use this method, the [Shooter] must be able to visualize a distance of 100 meters on the ground. For ranges up to 500 meters, the [Shooter] determines the number of 100-meter increments between the two objects he wishes to measure. Beyond 500 meters, he must select a point halfway to the object and determine the number of 100-meter increments to the halfway point, then double it to find the range to the object.
B) Range Card Method: The [Shooter] can also use a range card to quickly determine ranges throughout the target area. Once a target is detected, the [Shooter] determines where it is located on the card and then reads the proper range to the target.
C) Front Sight Post Method: Another method to estimate range is by using the front sight post as a scale. Generally, if a man-sized target is 1/2 the width of the front sight post, then he is approximately 300 meters away. If the target is 1/4 the width of the front sight post, then the target is approximately 600 meters away. This method can be used for a quick estimation and engagement.
D) Appearance of Objects Method: This method is a means of determining range based on the size and visible characteristics of an object. To use this method with any degree of accuracy, the [Shooter] must be familiar with the appearance and visible detail of an object at various ranges. However, some common guidelines can be used in relation to a human target to determine range.
- At 200 meters a human target is clear and details can be seen.
- At 300 meters the target is still clear, but no details can be seen.
- At 400 meters the target’s outline is clear; however, the target itself is blurry.
- At 500 meters the body tapers and the head disappears.
- At 600 meters the body resembles a wedge shape.
Good stuff… I prefer the Front Sight Post Method or the 2 MOA Red Dot Method I cover later.
Your rifle isn’t a hammer drill or a chainsaw, You don’t need to have a death grip on it. Excessive pressure on some “sweet spots” of certain rifles will affect the zero. Avoid smoking, chewing, dipping, chewing gum, or caffeine. This causes micro spasms in your muscles and accelerates your heart rate. Plus, it gives you mild anxiety. If you must, keep these products to a minimum.
Let’s talk about your sights. This is covered in more detail in the FM’s and TM’s.
All U.S. Military M4/M16 sights are marked with a serial, or a key, that tells you which Irons or ACOGs you have. If your iron sight says “6M” or “600M” as the last number that’s an M4 rear sight for 600 meter “Area Target” use. Fire 4-5 rounds, and you will hit your target at 600 meters; 3-4 MOA groups @ 100 meters x 6(of 600) is 3 or 4×6=18 inch or 24 inch spread at 600 meters. If your rear sight assembly says “8”, or 800, you have an M16 rear sight, or carry handle, for a 20 inch barrel. Make sure you don’t have these mixed up. This is a common mistake. Some people will say “These are more precise” WRONG! They are designed for the 20 inch barrel with Military Ammo. It’ll mess you up at longer ranges. 16 inch M4 carry handles exist as well. There are also rear sights for the M193 and the M855 cartridge. These are common mistakes. At least one of you has the wrong rear sight/ACOG.
The adjustment values for military rear sights and front sights are listed in the manuals linked above. Technically, this isn’t required, but it’s a good idea if you have the time. Your weapon should be mechanically capable of shooting about a 6-8 inch (+/-) group at 200 meters. Confirm Iron Sights at 300 or 350 meters. Most counties have 200 meter public shooting ranges. The 200 meter setting works too. Check your settings on the rear sight. You are going to have to fire 10 rounds to find the “center” of your group and shift the zero based on that point of impact relative to the point of aim. Not required, but is a good idea. Have faith in your equipment, it works.
When you zero your M4 style weapon, using standard Mil-Spec ammo, and a 25/300 target, you have two zeroes on one optic. One zero for 25 meters and the same hold for 300 meters. The “Hold” is the same. One groups on a dime, and the other shoots about an 9-12 inch group (3-4 MOA x 3(of 300 meters) is 9-12 MOA) Plus or minus a couple inches depending on the barrel and ammo spec’s. It’s 100% gonna be in that “Cone Zone” however. You can make some pretty incredible shots with an M4/M16 style AR weapon; It’s a great weapon.
Your “cone of fire” example. Any round can hit anywhere in the “Cone”. Totally Random.
Know your “Cone of Fire”, AKA, the “Cone Zone”
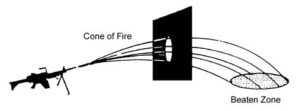
Some visuals for Trajectory. M855 “Green Tip” (Fire 4-5 times) Note the 25 meter and 300/350 meter X-axis values.
M855 compared to M193. It’s basically the same. Plus or minus a few inches.
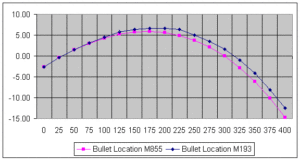
Don’t worry about 500-800 meters max range. Zero your weapon properly, and it’ll work. Adjust your rear sight, and fire 10 rounds at 500-800. Check and double check your wind.
Next topic.
“But Johnny, I have a Random Brand(TM) duplex reticle scope…?”
What’s the difference? Nothing! 25/300(or 25/350) meter zero!
Let’s talk about your Random Brand(TM) Scope
The bullet trajectory doesn’t change. You can use the zero target placed at 25 meters to observe your reticle size relative to your target. Record this data on a separate printed zero target. Keep for reference. Duplex Reticles are quite useful. Lots of measuring is possible. Get creative. Check your values based on magnification. I’d use the highest setting and the lowest. And remember to keep it there. Record one set of data on one side, and one on the other. Get creative, stay consistent. Be scientific. This is possible. I have done it before on my duplex scopes. You can be VERY effective with a duplex scope. Have faith in your equipment.
Let’s talk about ACOGs. Because there are probably 50 different ACOGs in the wild.
ACOG makes several different BDC’s for various barrel lengths and cartridges. You should call ACOG and check your scope’s specs; Or use their web chat technical help desk. They make a carry handle mount specific ACOG with a BDC to account for the higher mounting offset. There are too many models to list, so I suggest you use their webpage and technical help desk. You cannot just slap any ACOG on any barrel length and use any cartridge. They have specific flavors for different mounting points, barrel lengths, and cartridges. If you zero your ACOG, I suggest using a 100 meter zero on the 100 meter marker, wherever that may be depending on your reticle style. In a pinch, you can use a 25/300 target. But make sure your use the 300 meter marker on your ACOG’s BDC at 25 meters. Aim small. If you have an ACOG with a different cartridge, zeroing for medium range, or half way on the BDC, is the best “quick fix”. ACOGS are worth every penny.
The Primary Arm’s scopes, with ACSS, have a huge following. Never used one. Same Principle.
Confirm at 100 when you can if using mil spec ammo; Usually they require some adjustment. Remember, it’s a 3-4 MOA group @ 100. I recommend firing ten rounds at 100 meters and 200 meters for confirmation. You’ll shoot a baseball, or softball, sized group at 100 and inside the flat part of a paper plate at 200 meters with mil spec ammo. You have to fire this many rounds at longer ranges because the “Group” can be rather large, and hard to read if you don’t fire enough cartridges. Mark your impacts. I recommend using “shoot and see” targets with a spotting scope, or man size steel. Measure the distance to the target from the center of the group and adjust based on the value listed for the adjustments on the optic. Use a compass(from middle school to draw circles to find your center) Fire again for confirmation.
Let’s talk about your red dot sight. AKA the RDS. My personal favorite.
There are a lot of myths about red dots. The biggest myth is that they are strictly short range optics. This isn’t true. The red dot can effectively engage targets to medium ranges, and even long range if you have some practice. Your visual acuity, knowledge of your target, wind reading, and your rifle is your only true limit; Assuming, of course, you have good fundamentals for marksmanship. Combining your red dot with a proper set of iron sights is also a cheap effective alternative. The Cowitness RDS/Iron sight combination has killed many men in combat. Your Red Dot Sight is pretty forgiving at 300 meters; And wild enough, the circle of the 2 MOA red dot is about, but not quite, the same size as your 300 meter group. Your rounds are going to hit somewhere in that circle, or just on the edge/outside of the “corona” of the red dot at 300 meters with a 16 inch barrel; Or 350 meters with a 20 inch.
The 2MOA dot is about 4 inches at 200 meters. If you check the graph chart above for the holds, you’ll notice it’s about 5,10, and 5 inches high at 150ish, 200ish, and 250ish respectively. Your dot is about 4 inches at these distances(about). Hold on your target, check the hold, adjust, and fire. Your dot is about the size of a baseball at 150 meters, and a soft ball at 250, and scales relative to the target based on the distance. Stack those red dots like a snowman, remembering your hold on the belt buckle. If you don’t know the distance, or are firing in a hurry, start low and fire 10 rounds, stacking your dots with each shot consecutively. You’ll hit your target. A LOT.
It should look like the example below. But stacked like a snowman.
. Bang-Bang
. Bang-Bang
. Bang-Bang
. Bang-Bang
. Bang-Bang
Understand? That’s a 20-25 inch vertical spread at 200 meters. You should at least hit the target 4-5 times; Likely all 10 times. If the target is laying in the prone at 200 meters, hold two dots low, and work your way up. This works for longer ranges like 400 and 500 meters. Because 3-4 MOA; Right? Which is a 16-20 inch spread at 400-500 meters. Remember your “Cone of Fire”. With an 8 or 10 inch dot at those distances respectively. Work it out. This trick works. Hold on the belly, start shooting, and stacking snowman red dots. I bet you get 5 hits out of 10 rounds. Stack and shoot those snowmen.
Red Dot Sight Measurement Method.
Your 2 MOA dot is…
2 inches at 100 meters, AKA, The size of someone’s eyeball at that distance.
4 inches at 200 meters, AKA, The size of someone’s fist or palm/rifle magazine/Goatee zone.
6 inches at 300 meters, AKA, Inside of the face.(Test this on the 25/300 meter zero target…)
8 inches at 400 meters, AKA, On their face/ the size of their head or slightly larger.
10 inches at 500 meters, AKA, Looks like they are holding a basketball.
Remembering your “Cone of Fire” measure twice, work the problem, and aim for “center mass” with corrections and compensations for wind, distance, or angle and direction of travel(Check Manual for graphs on angles of engagement and moving targets; That’s expert mode)
Let’s zero the red dot
When using the dot in a Red Dot Sight to zero, you want to hold the bottom of the red dot’s “circle” on the bottom of the zero target. Right on that nice crispy line. Your 2MOA dot should be on the lowest visible setting(plus one click), to prevent confusion with the ‘Corona” or “Crown” that washes out your crispy red dot. Once you use the bottom of the target for zero, hold the top of the red dot’s circle on the inside of the top of the head. Cradle the curve of the dot with the curve of the head. Fire another group to confirm zero. Take your time, relax, don’t rush. Give it a click or two if you need to. Zero dead on with the dot.
Run a few dry, clean patches through your barrel down and out the same direction of the bullet. Same for a sharp, clean bore snake. Do this between groups.
Test your zero on the circles on the outside edge of the target. Just like the iron sight zero process earlier. Shoot 4 of them on one side of the target with one round each. If you favor slightly high, low, left, or right; Adjust your sight 1 click. Do not adjust if you cannot notice a difference. You need to breath, relax, and take your time. Repeat as needed. Mark your shots, and get a good, solid perfect zero. Remember to “cradle” your red dot with the top, or bottom, of the circles for consistency.
Remember this, for every little bit that your zero is off, it is drastically off at longer distances. Making your weapon ineffective at longer ranges very, very quickly. This matters in the real world because people hide, and present very, very little of their body. Usually just a part of their hand and half their face. This is a very, very small target to hit beyond 200 meters. If your zero is off, you will die trying. This is why I say you should fire 5, or 10 rounds. To suppress, and, shoot your target. Personally, the machine gunner on my right shoulder says mag dump nationalism is the correct answer. Hard to say…
1/4 inch at 25 meters can be off as much as +/-8 inches off at 300 meters.
Best of luck to you…
Have fun shooting. Be safe. Teach your friends. Share this article. Wear your PPE. This shouldn’t take too many rounds. Maybe 50 or 60 rounds per gun. Despite the high cost of ammo these days($50-$60 respectively at $1 per round) is not a terrible price to pay. It is still possible to go to the range, have fun, and be extremely productive with your time and dime. I have shifted from ready up drills and smacking steel to putting a very, very serious zeroes on my weapons. And attempting tricks like cutting clothes lines at 200 meters. You can imagine why cutting wires with a rifle is a good skill to have.
Thanks for reading. Check your zero.
- Get link
- X
- Other Apps



Comments
Post a Comment
Comments are very welcome with the following proviso: Comments can't detract from the subject in the post. Debate is fine; 'hi-jacking', ad hominem, vitriol, 'sniping,' reprehensible language for the sake of it, and so forth will not be tolerated and get the offender banned. Once banned, there's usually no 'do over.'